Crafts

Tie & Dye Crafts at Indigo Dying House

Dying our creations

Dying our creations

During our holiday in Taiwan I brought the kids to try out various different crafting activities. Many of these activities are extremely expensive if it was done in Singapore and it was great that we could try out many different activities at an affordable price.

Indigo Dyeing House was one of the place which we visited. Located in Miaoli County  this  Dyeing house uses natural dies from plants to color their products.

The teacher explaining about the tie dye process

The teacher explaining about the tie dye process

Before we started on our crafting we had to choose the item we wanted to dye.  There were many different items which we could make ranging from lamp shades, handkerchiefs, bags or even scarfs. Tiger girl chose to make a scarf for her paternal grandmother while the  Monkey boy chose a handkerchief and Doggie boy a Strawberry  Bag.

The other side of the workshop

The other side of the workshop

The workshop was divided into two sections.  There were benches for the participants to do the tying of the material and the other section was where the dying took place.

The teacher showing the different patterns that one can make

The teacher showing the different patterns that one can make

The kids in action deciding on how to tie their pieces

The kids in action deciding on how to tie their pieces

The kids had to use the rubber band and sticks to tie the pattern that they wish to see on their pieces of art.

Tiger girl picking up the chopsticks to tie

Tiger girl picking up the chopsticks to tie

The patterns that were made on the cloths were done by using the chopsticks/ ice-creme sticks to block out certain parts of the cloth so that it is not stained by the dye.

I personally have taught Tie Dye during Art lessons in school but we never used natural dyes nor sticks in creating the patterns on the cloths. What we used were just rubber bands and marbles.

Doggie boy soaking his piece in blue dye.

Doggie boy soaking his piece in blue dye.

After each piece had been tied up it was time to dye it. We had to use aprons and gloves so that we wouldn’t get the dye onto our clothes. Each piece had to be soaked within the blue tie for 3 minutes before being giving it a rinsed. There had to be  3 rounds of soaking to ensure that the cloth absorbed enough of the dye.

The design on grandma's scarf

The design on grandma’s scarf

The design on Tiger girl's scarf

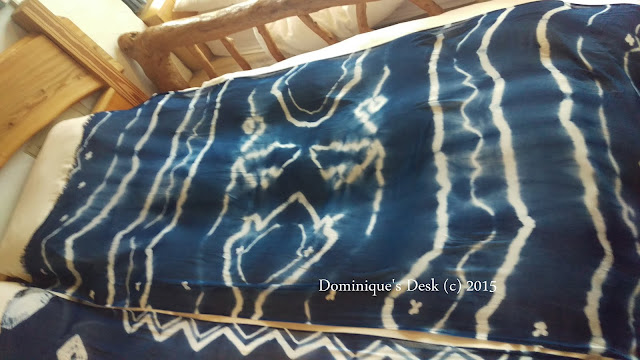
The design on Tiger girl’s scarf

Monkey boy's handkerchief

Monkey boy’s handkerchief

Doggie boy's Strawberry Bag

Doggie boy’s Strawberry Bag

Have you tried Tie Dye before?

卓也藍染 Indigo Dyeing House
No.1-9, Bengshanxia, Sanyi Township, Miaoli County 367, Taiwan
new button

Gift Wrapping with Jane Means

Wrapped gifts on display

Wrapped gifts on display

Last weekend was a special weekend for me.  It was the first time that I attended a hands on  Gift wrapping Workshop.

I was privilege to attend the workshop conductor conducted by famed  Author, Presenter and Designer Jane Means from UK.

She has been wrapping for many big brands for the past 15 years and has her own line of gift wrapping accessories and stationary which she sells online.

The basic tools that was needed- Scissors and tape

The basic tools that was needed- Scissors and tape

The first thing we learned  in the workshop was how to make a simple bow out of a wired ribbon.

Instruction cards on how to make a rose

Instruction cards on how to make a rose

We started off by making a 3 pleat bow and later added a rose to it.

Using the bow and rose as a plate directions

Using the bow and rose as a plate directions

As you can see by adding the rose to the bow it gives it a lot more “volume”.

Using the bow on a bottle we wrapped up.

Using the bow on a bottle we wrapped up.

Bows are very versatile and can be used to dress up any item. You can see it here being use to decorate a bottle which had been wrapped up.

The bow and rose used as decoration on a box

The bow and rose used as decoration on a box- The example done by Jane.

Mine isn’t half as pretty as the one made by Jane and certainly needs  lots to work on to get to her standard. I definitely need more practice!!

Wrapping a flat present

Wrapping a flat present

Besides learning how to make bows out of wired ribbons we also made bows out of ribbons of different materials.

I learned how to make a tailored ribbon bow which could be used for boxes or any odd shaped presents.  In the collage above you could use the bow to decorate the tissue which was used to wrap up the present.

If just having a simple bow on a tissue wrapped present isn’t desirable there are other ways which you can do you gift wrapping.

For the same packet of sweets we can add another layer of wrapping using  cellophane to give “bulk” to the gift . ( seen above)

DIY envelopes decorated with ribbons

DIY envelopes decorated with ribbons

Another items which Jane showed me how to make are these  envelopes from wrapping paper.

They are quite simple to make and are great for small items or even samples which can be use as door gifts at an event.

A pinwheel

A pinwheel

This pinwheel certainly makes a great prop for decorating a  gift table or buffet table.   I didn’t make a pinwheel during the workshop but a blue pompom instead.

A Tin with a pompom on the top

A Tin with a pompom on the top

Using a pompom as a decoration really makes the present look so much more eye catching. Using  the pompom as the center piece on the wrapped up tin makes it more outstanding and it’s certainly not that difficult to make. If you are not sure how to make it you can refer to the tutorial on tissue pompom on Jane’s blog.

A ric rac flower decoration

A ric rac flower decoration

This has to be one of my favourite decorations that afternoon. Making a ric rag flower is quite easy and it really looks very pretty.

A present with another ric rag flower

A present with another ric rac flower

All you need is some ric rac ribbon  and twirl it into a flower before attaching some stitches at the bottom to hold it in place. What  would like to try is a dual color rose made from ric rac ribbon as I’m sure it will look even more outstanding.

Our group photo with Jane Means

Our group photo with Jane Means

It was a really lovely afternoon for me and I had lots of fun learning new wrapping techniques while attending the workshop with fellow SMB bloggers.

I certainly recommend that you sign up  for a gift wrapping class if you are interested in jazzing up your gifts.

Disclaimer: I was invited to attend this  gift wrapping  workshop. All opinions are 100% mine